


Sometimes you want to take a screenshot on your MacBook or iMac for saving your work, for sharing something important with others, or for using it in school or office projects. macOS offers many simple ways to take screenshots using built-in tools. But many new users find it hard to figure out where the screenshots go or how to edit them after taking it.
This article will guide you in a step-by-step way and help you learn all the methods of taking screenshots on Mac. You will also learn how to copy, save, and find the screenshot after taking it. Also, if you want more screenshot features, then we share some third-party apps too.
Quick Screenshot Shortcuts on Mac

Mac gives 3 main shortcut keys for taking screenshots. These shortcuts are easy to remember and work in most of the latest macOS like Ventura, Monterey, or Big Sur.
- Command + Shift + 3: This takes a screenshot of the whole screen
- Command + Shift + 4: This lets you select the area that you want to screenshot
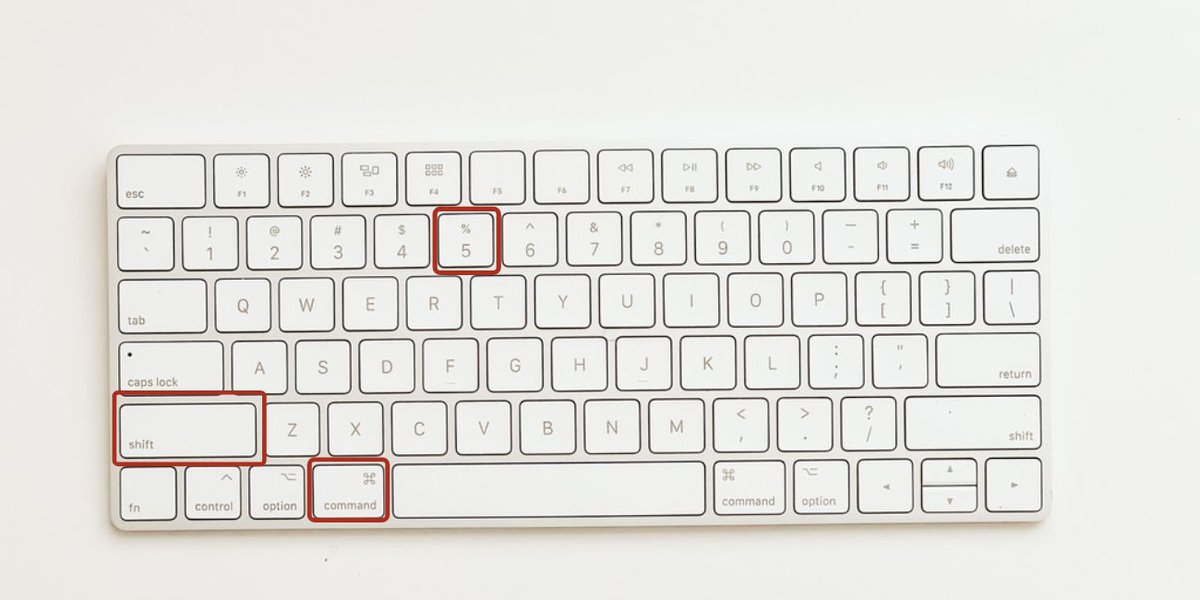
- Command + Shift + 5: This opens a screenshot menu where you get many options like record screen, set a timer, or change the save location
These shortcuts work on MacBook Air, MacBook Pro, iMac, and even Mac mini. You don’t need to download any app to use them. Just press the keys and it will do the job.
If you press Control + the above shortcuts, it will copy the screenshot to your clipboard instead of saving it as a file. You can then paste it in apps like Notes, Pages, or WhatsApp Web directly.
Different Ways to Take a Screenshot on Mac
Now we will explain each method in more detail for better understanding. You can use the method that is easy for you.
1. Take Screenshot Using Keyboard Shortcuts
This is the fastest method. You can use the shortcut keys explained above. If you press Command + Shift + 4, then you can drag your mouse or trackpad and select the part of the screen you want to capture. This is very useful when you only need a small area and not the full screen.
If you want to capture only a specific window, like Safari or Finder, then press Command + Shift + 4 and then press the Spacebar. Now the mouse pointer will turn into a camera icon. Click on the window you want, and Mac will save only that part.
2. Take Screenshot Using Toolbar Menu (Command + Shift + 5)
This is a special menu available in macOS Mojave and above. When you press Command + Shift + 5, a small bar appears on the bottom of your screen. From there, you can choose:
- Capture Full Screen
- Capture Selected Window
- Capture a Selected Portion
- Record Entire Screen
- Record Selected Area
- Set Timer before capture
- Change Save Location (Desktop, Documents, Clipboard)
This method is best for beginners because everything is shown on screen and you can click what you want instead of pressing too many keys.
3. Capture Touch Bar on MacBook Pro (if available)
Some MacBook Pro models come with a Touch Bar above the keyboard. If you want to take a screenshot of that Touch Bar, then press Command + Shift + 6. It will save the image of the Touch Bar as a PNG file on your desktop.
You can also add a screenshot button directly to the Touch Bar by going to System Settings > Keyboard > Customize Control Strip, and drag the screenshot icon.
Where Does Screenshot Save on Mac and How to Change It
By default, when you take a screenshot, macOS saves the image on the Desktop. The file name will look like this:
Screen Shot 2025-06-30 at 5.30.12 PM.png
If you want to save it in a different folder like Downloads or Documents, then press Command + Shift + 5, click Options, and choose the folder where you want to save it.
You can also copy screenshots to the clipboard by pressing the Control key with the shortcut. Then paste it with Command + V into apps like Messages, Mail, or Google Docs.
Best Free and Paid Screenshot Apps for Mac

If the built-in tools are not enough for you, then there are some apps that give extra features. These apps are used by YouTubers, designers, developers, and office workers who want more control.
- CleanShot X: You can blur sensitive info, scroll capture, upload to the cloud, and edit quickly
- Snagit: Good for tutorials with both screen recording and screenshot editing
- Lightshot: Easy and fast, supports online upload
- Monosnap: Has good annotation and works well for developers
All these apps support Mac and are better than the built-in tools if you need advanced editing or sharing features.
Extra Tips for Screenshot Users on Mac
If you take screenshots daily then you can try these tricks to save time and keep things clean:
- Change screenshot format to JPG, PDF, or TIFF using Terminal
Open Terminal and write:
defaults write com.apple.screencapture type jpg
Then write:
killall SystemUIServer
(Now screenshots will be saved in JPG format) - Use Shortcuts App to automate screenshot actions like renaming or moving to folder
- Create folders by date or project to manage your screenshots easily
- Hide the screenshot thumbnail if you don’t want a preview (Settings > Keyboard > Shortcuts)
Conclusion
So this is the complete and easy guide to taking screenshots on your Mac. From shortcut keys to full toolbar use, now you know all the working ways to capture your screen. You can also use some apps if you want better tools than the built-in options. Taking screenshots on macOS is simple; you just need the right steps.
If this guide helped you, please leave a comment or share it with your friends. It will also help them if they are new Mac users.