

Mac users do not need to install a separate compression app for most everyday file archiving tasks. macOS includes built-in tools that can create ZIP files, open ZIP archives, and manage common compressed folders directly from Finder. Whether you are sending documents by email, backing up a folder, or downloading a compressed file from the web, the process is simple once you know where to look.
TLDR: You can zip files on a Mac by selecting them in Finder, right-clicking, and choosing Compress. To unzip a file, simply double-click the ZIP archive and macOS will extract it in the same location. These built-in features require no extra software and are suitable for most common ZIP tasks. For best results, organize your files first and rename the archive clearly before sharing it.
What zipping and unzipping means on a Mac
A ZIP file is a compressed archive that can contain one file, several files, or entire folders. Compressing files into a ZIP archive can make them easier to send, store, and organize. In many cases, a ZIP file may also reduce the total file size, although the amount of compression depends on the file type.
For example, plain text documents and spreadsheets may compress noticeably, while images, videos, and PDFs may not become much smaller because they are often already compressed. Even when the size reduction is modest, ZIP files remain useful because they bundle multiple items into one convenient package.
On macOS, the built-in compression feature is handled quietly through Finder and the system’s Archive Utility. You usually do not need to open Archive Utility directly. Finder provides the options you need through the right-click menu and normal double-click behavior.

How to zip a single file on Mac
If you only need to compress one document, image, or other file, the process is straightforward. This is useful when you want to send a file through email or upload it to a website that accepts ZIP archives.
- Open Finder.
- Locate the file you want to compress.
- Right-click the file. If you use a trackpad, you can usually click with two fingers.
- Select Compress “[file name]” from the menu.
- Wait for macOS to create the ZIP file in the same folder.
The new archive will usually appear beside the original file. For example, if you compress a file named Report.pdf, macOS will create a file named Report.pdf.zip. The original file remains unchanged. Compressing does not delete, move, or modify the source file.
How to zip multiple files on Mac
To compress several files together, select them first and then use the same built-in compression command. This creates one ZIP archive containing all selected items.
- Open Finder and go to the folder containing the files.
- Select the files you want to include. You can hold Command while clicking to select separate items.
- Right-click one of the selected files.
- Choose Compress from the shortcut menu.
- macOS will create a ZIP archive in the same location.
When you compress multiple selected items, macOS typically names the result Archive.zip. It is wise to rename this file before sending or storing it. A name such as Client Documents April.zip or Project Photos Final.zip is much clearer than a generic archive name.
Important: If you are preparing files for someone else, review the contents before compression. Make sure you are not accidentally including private notes, outdated versions, temporary files, or unrelated documents.
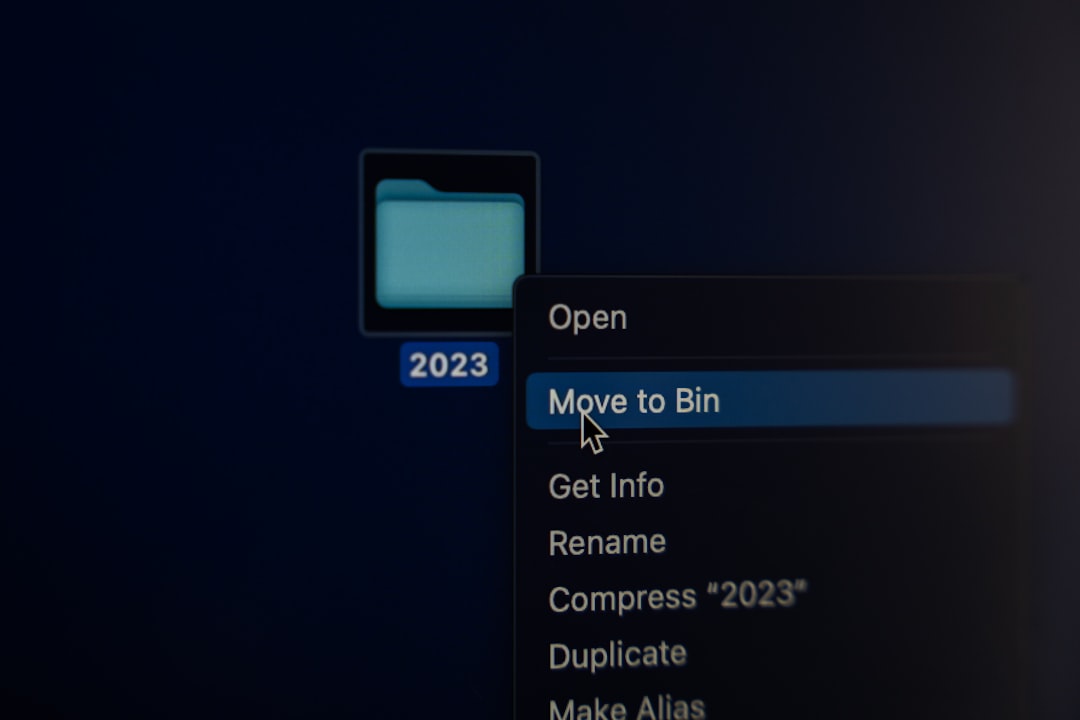
How to zip a folder on Mac
Zipping a folder is often the cleanest way to preserve structure. If a project contains subfolders, images, spreadsheets, and documents, compressing the folder keeps everything organized inside one archive.
- Open Finder.
- Find the folder you want to compress.
- Right-click the folder.
- Select Compress “[folder name]”.
- Wait for the ZIP file to appear.
The resulting ZIP file will contain the folder and its contents. When someone extracts it, they should see the same folder structure. This is generally preferable to selecting many individual files, especially for larger projects.
How to unzip a ZIP file on Mac
Unzipping is even simpler than zipping. In most cases, you only need to double-click the archive.
- Locate the ZIP file in Finder.
- Double-click the ZIP file.
- macOS will extract the contents in the same folder.
- Open the newly created file or folder to review the extracted contents.
If the ZIP file contains a folder, macOS will usually create that folder beside the ZIP archive. If it contains only one file, that file may appear directly in the same location. The original ZIP file remains in place unless you delete it manually.
After extracting, it is good practice to confirm that the files opened correctly before deleting the original ZIP archive. This is especially important for downloaded files, backups, and documents you received from someone else.

Where extracted files go
By default, macOS extracts ZIP files into the same folder where the ZIP archive is located. If the ZIP file is in Downloads, the extracted contents will appear in Downloads. If the ZIP file is on the Desktop, the extracted contents will appear on the Desktop.
This predictable behavior helps prevent confusion, but it can also clutter your Downloads folder over time. If you regularly work with archives, consider creating a dedicated folder such as Extracted Files or Incoming Archives. Move ZIP files there before opening them, so the extracted contents stay organized.
Renaming a ZIP file properly
After creating a ZIP file, you can rename it like any other file on your Mac.
- Click the ZIP file once in Finder.
- Press Return on your keyboard.
- Type a clear new name.
- Keep the .zip extension at the end.
- Press Return again to save the name.
A clear name helps recipients understand what the archive contains. Avoid vague names such as Archive.zip, Files.zip, or New Folder.zip when sending important material. A more professional name reduces the chance of mistakes and makes the file easier to locate later.
Using the File menu to compress items
Right-clicking is the most common method, but it is not the only one. You can also use Finder’s menu bar.
- Select the file or folder in Finder.
- Click File in the menu bar at the top of the screen.
- Choose Compress.
This method is useful if you prefer menu-based navigation or if right-clicking is not convenient. The result is the same: macOS creates a ZIP file in the current folder.
How to zip files from a Mac for Windows users
ZIP is a widely supported format, so archives created on a Mac can normally be opened on Windows computers without special preparation. However, Mac ZIP files may sometimes include small system-related files, such as __MACOSX folders or metadata files, when viewed on another operating system. These files are usually harmless, but they can look confusing to recipients.
For most business and personal uses, Finder’s built-in ZIP feature is acceptable. If you are sending files to Windows users, consider these practical steps:
- Use clear folder names before compressing.
- Avoid unusual symbols in file names, such as slashes, colons, or nonstandard characters.
- Keep paths short by avoiding deeply nested folders.
- Tell the recipient which folder or file they should open after extracting.
These habits reduce confusion and help ensure that your archive is easy to use on different systems.
Can you password protect a ZIP file without extra software?
Finder’s built-in compression option does not provide a simple password protection checkbox. macOS does include command-line tools that can create password-protected ZIP files through Terminal, but this method is more technical and should be used carefully.
If you are comfortable with Terminal, you can create an encrypted ZIP archive using the zip command. For example, you can open Terminal, navigate to the folder containing your files, and use a command such as:
zip -er ProtectedArchive.zip FolderName
The -e option enables encryption, and -r includes the folder contents recursively. Terminal will ask you to enter and verify a password. Be aware that forgotten ZIP passwords usually cannot be recovered easily. Use a strong password and store it securely.
For sensitive information, consider whether ZIP encryption is sufficient for your needs. In professional environments, approved security tools, encrypted disk images, or managed file-sharing systems may be more appropriate.
How to unzip files that do not open correctly
Most ZIP files open normally with a double-click. If an archive does not extract, the issue may be with the file rather than your Mac. The archive may be incomplete, corrupted, or created in a format that is not actually ZIP.
Try the following steps:
- Download the file again if it came from the internet.
- Check the file extension to confirm it ends in .zip.
- Move it to a simple location, such as the Desktop, and try again.
- Verify available storage on your Mac before extracting large archives.
- Ask the sender to recreate and resend the archive if the problem continues.
If the file has an extension such as .rar, .7z, or .tar.gz, Finder may not handle it the same way as a standard ZIP file. macOS can work with some archive formats, but ZIP remains the most straightforward built-in option for general users.
How to avoid common mistakes
Although zipping and unzipping files on a Mac is simple, small mistakes can create delays or confusion. A disciplined approach is especially important when files are being shared with clients, colleagues, schools, or official organizations.
- Do not zip unnecessary files. Review the folder before compressing it.
- Do not assume compression greatly reduces size. Videos and images may remain large.
- Do not delete originals too quickly. Confirm the archive works first.
- Do not rename the extension. Changing .zip may make the file harder to open.
- Do not open suspicious archives. Only extract files from sources you trust.
Security deserves particular attention. A ZIP file can contain unsafe files just as a normal folder can. If you receive an unexpected archive, especially from an unknown sender, treat it cautiously. Do not open applications, scripts, or unfamiliar files unless you are confident they are legitimate.
Managing ZIP files after extraction
Once you unzip an archive, you may have both the original ZIP file and the extracted folder. This is normal. You can keep both, but doing so may waste space if the contents are large.
A practical workflow is to extract the archive, inspect the contents, move the useful files to the correct location, and then decide whether to keep or delete the ZIP file. If the ZIP file is a backup, keep it in a clearly labeled storage location. If it was only a temporary download, deleting it after verification is usually reasonable.
When the built-in Mac tools are enough
For ordinary ZIP files, macOS provides everything most people need. You can create archives, extract them, rename them, and share them without installing anything. This reduces security risk, avoids unnecessary system clutter, and keeps the process consistent across Macs.
Extra software may be useful for advanced archive formats, batch operations, repair tools, or specialized encryption needs. However, for standard ZIP files, the built-in Finder and Archive Utility functions are reliable, simple, and already available.
Final thoughts
Zipping and unzipping files on a Mac without extra software is a basic but important skill. The built-in Finder commands are suitable for everyday work, from sending a few documents to packaging a complete folder. The safest approach is to keep files organized, name archives clearly, verify extracted contents, and be cautious with ZIP files from unknown sources.
With these habits, you can handle compressed files confidently on macOS without adding unnecessary applications or complicating your workflow.