
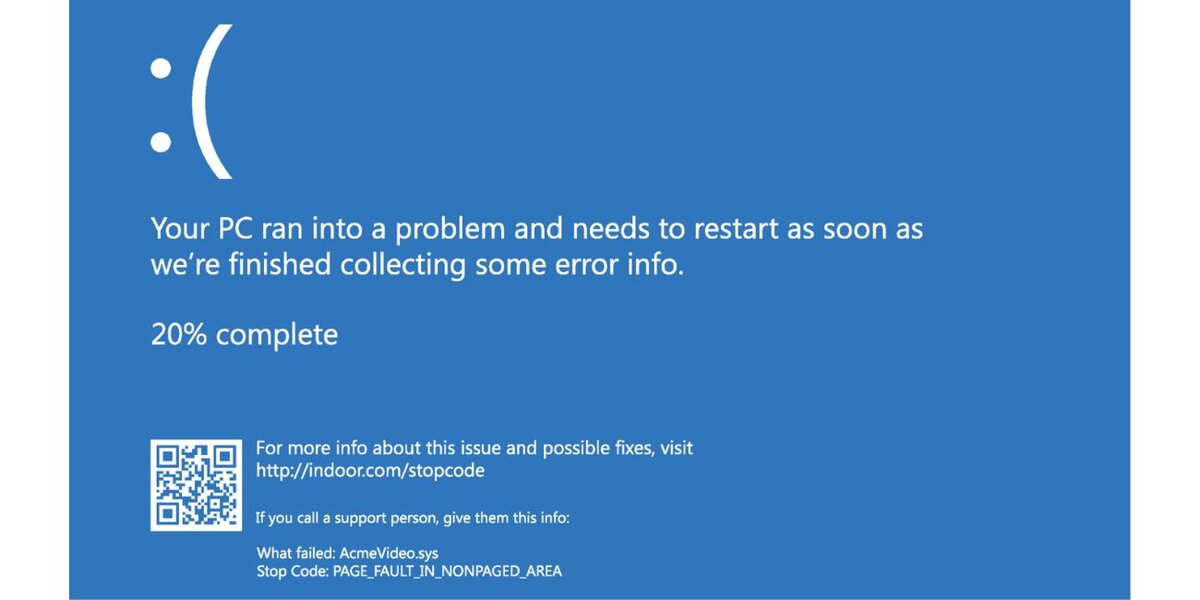
If your Windows 10 PC shows a blue screen with the message PAGE_FAULT_IN_NONPAGED_AREA, it means your system tried to access memory that should never be paged out, and it failed. This is a serious error that causes your computer to crash and restart unexpectedly.
You may see it linked with files like AcmeVideo.sys, ntoskrnl.exe, or after recent hardware or driver changes. This article walks you through what causes this error and how to fix it step by step.
What Causes the PAGE_FAULT_IN_NONPAGED_AREA Error?
This error is usually linked to issues with memory access, drivers, or system files.
Common causes include:
- Faulty or incompatible drivers (like AcmeVideo.sys)
- Failing RAM or bad memory sectors
- Corrupt Windows system files
- Antivirus or firewall conflicts
- Failing hard drives with bad sectors
- Incorrect page file settings
Windows uses “nonpaged memory” for critical tasks. When something tries to access it and fails, the system crashes with this stop code.
Step-by-Step Fixes for PAGE_FAULT_IN_NONPAGED_AREA
Each of the following methods addresses a possible root cause. Follow them in order until your issue is resolved.
1. Restart in Safe Mode
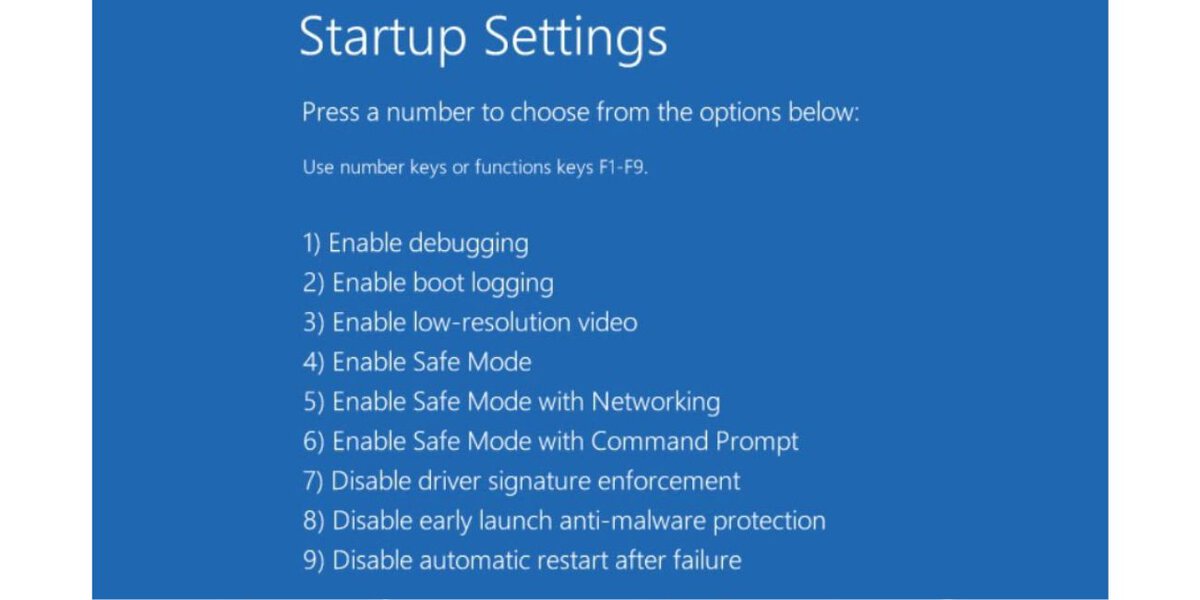
Safe Mode helps isolate the problem by loading only core Windows files.
To boot into Safe Mode:
- Hold Shift and click Restart from the Start menu.
- Go to Troubleshoot > Advanced Options > Startup Settings.
- Click Restart, then press F4 or F5 to start Safe Mode.
This gives you a clean environment to run diagnostics and fix problems without interference.
2. Run Windows Memory Diagnostic
Faulty RAM is one of the top causes of this error. You can test memory directly.
Here’s how:
- Press
Win + R, typemdsched.exe, and hit Enter. - Select Restart now and check for problems.
- Let your computer reboot and run the scan.
- After the scan finishes, Windows will show results at the next login.
If it reports issues, replacing the RAM is usually the best option.
3. Update or Roll Back Device Drivers
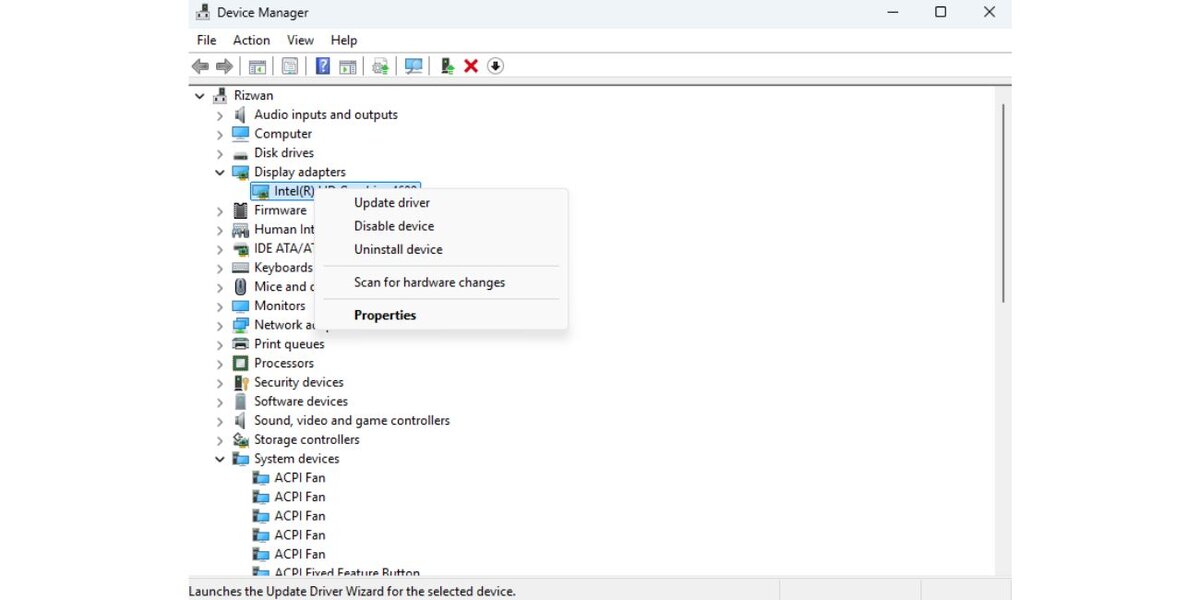
Drivers are another major cause—especially GPU and storage drivers.
To update or roll back:
- Press
Win + Xand open Device Manager. - Expand the section (like Display adapters), right-click the driver, and choose Update, Uninstall, or Properties > Roll Back if available.
- Restart your system afterward.
If you recently updated a driver and the error began after that, use the Roll Back option.
4. Run SFC and DISM to Repair System Files
Corrupt system files can crash the memory management process.
Use these commands to fix it:
sfc /scannow
- Open Command Prompt as Administrator
- Type the above command and press Enter
- Wait for the scan to complete (this can take 10–15 minutes)
Still getting the error? Then run:
DISM /Online /Cleanup-Image /RestoreHealth
This command uses Windows Update to fix deeper system issues.
5. Use CHKDSK to Scan Your Hard Drive
Bad disk sectors can cause page file errors.
Here’s what to do:
- Open Command Prompt as Administrator
- Type this command:chkdsk C: /f /r
- Press Y when asked to schedule the scan
- Restart your PC so CHKDSK can check and fix the drive during boot
Let the scan run fully—it might take 15–60 minutes depending on drive size.
6. Disable or Uninstall Antivirus Temporarily
Some third-party antivirus tools (like Avast, AVG, or Kaspersky) cause memory errors during real-time scanning.
Try these steps:
- Open your antivirus app and disable protection temporarily
- Reboot and test system stability
- If the issue stops, consider replacing your antivirus or reinstalling it clean
Windows Defender is often more stable and enough for everyday protection.
7. Check for Windows Updates
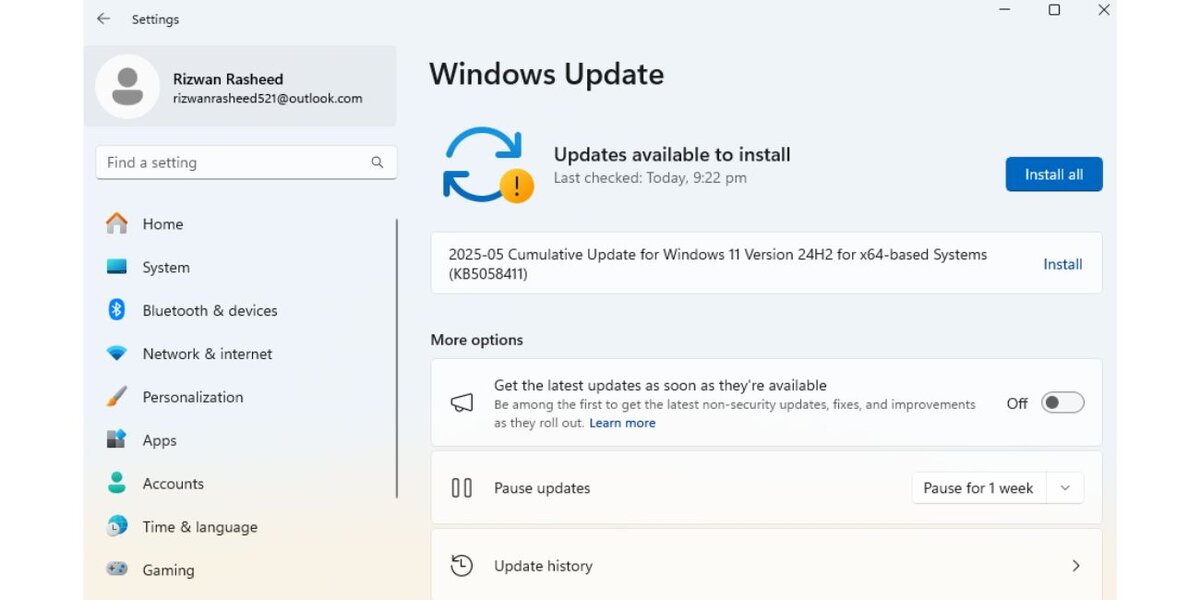
Installing the latest updates can fix driver issues and bugs tied to memory management.
To update:
- Go to Settings > Update & Security > Windows Update
- Click Check for updates
- Download and install everything available
- Reboot your computer
Even optional updates may include bug fixes for your hardware drivers.
Advanced Fixes (Use Only If Others Don’t Work)
If the issue still appears, you can try advanced troubleshooting.
- Driver Verifier: Forces Windows to stress-test drivers and detect the bad ones.
- System Restore: Roll back to a working state from before the error started.
- Disable Paging File: Not recommended for most users, but disabling the page file can sometimes stop this error if it’s corrupted.
Fixing Driver-Specific Errors (e.g., AcmeVideo.sys)
If your BSOD shows a specific file like AcmeVideo.sys, it’s likely linked to a third-party video driver.
To fix it:
- Boot into Safe Mode.
- Download Display Driver Uninstaller (DDU).
- Use DDU to completely remove the GPU driver.
- Visit the official website (e.g., NVIDIA or AMD) and install the latest stable version.
This replaces the corrupt driver with a clean, verified one.
When to Get Help
If none of the fixes work:
- You can’t boot into Windows at all.
- You’re seeing multiple blue screen errors.
- Your system crashes even in Safe Mode.
- Tools like MemTest show hardware failure.
At that point, it’s best to consult a technician or contact your system manufacturer.
Final Tips to Prevent BSODs Like This
Here are some practical steps you can try to fix the PAGE_FAULT_IN_NONPAGED_AREA error on your Windows 10 system
- Keep your drivers up to date from official sources.
- Scan your disk and memory monthly.
- Don’t ignore blue screen codes—check what they mean.
- Avoid using third-party driver installers.
- Keep a recent System Restore point set.
Fixing the PAGE_FAULT_IN_NONPAGED_AREA error can be frustrating, but in most cases, it’s caused by a driver or memory issue that can be solved with a few careful steps.
If this helped you, share it with others or comment below with your experience—we’d love to hear what worked for you.