
Recording your computer screen might sound like something only tech-savvy professionals do. But in reality, it’s a tool nearly anyone can benefit from. Whether you’re creating a how-to video, capturing a software bug, recording a video call, or saving a tutorial for future reference, knowing how to record your screen can be a serious productivity boost.
The good news? You don’t need any fancy setup or expensive software to get started. Whether you’re on a Windows PC, a MacBook, or just want to try a quick online tool, there are solid options available.
Below, we’ll walk through built-in tools, downloadable software, and online screen recorders — along with practical tips to make your recordings look and sound better.
How to Record Your Screen Using Built-In Windows and Mac Tools
Let’s start with what your device already offers. Both Windows and macOS have native screen recording features, which means you can jump right in, no downloads required.
1. Screen Recording on Windows
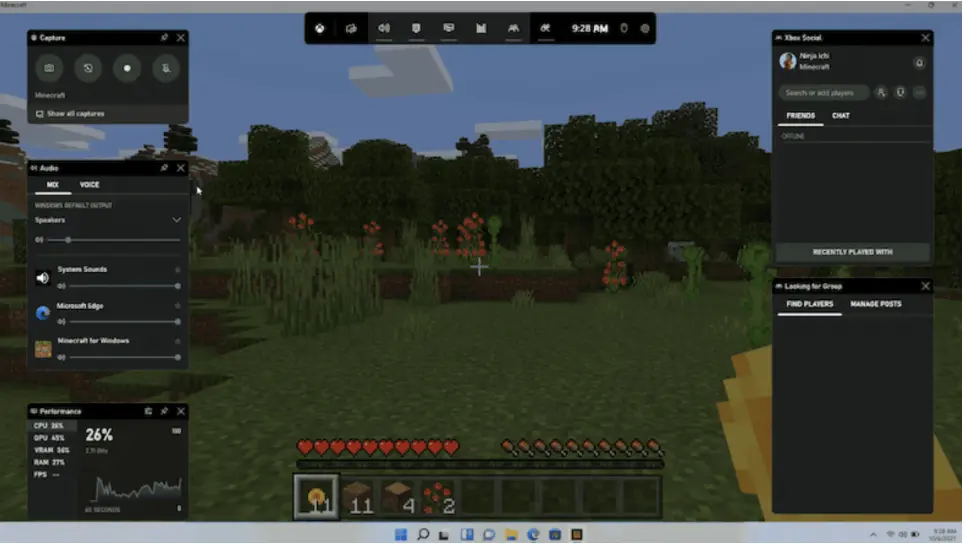
If you’re using Windows 10 or Windows 11, you’re in luck. Microsoft has a tool built into the Xbox Game Bar that lets you record applications on your PC with minimal effort.
To activate the tool, press Win + G. This shortcut launches the Xbox Game Bar overlay. From here, you’ll see a range of widgets, but you’ll want the one labeled “Capture.” Hit the record button, and you’re off.
A few things to know:
- You can only record specific windows or apps, not your entire desktop or File Explorer.
- Audio can be included, so make sure to adjust your microphone and system sound levels.
- For faster access in the future, try using Win + Alt + R to start or stop recording instantly.
So while this isn’t the most flexible recorder out there, it’s one way film for Windows users who just need quick, no-frills functionality.
2. Screen Recording on macOS
Apple makes it equally simple to record your screen with built-in tools. If you’re on macOS Mojave or later, press Shift + Command + 5 on your Mac keyboard. This opens a small panel that lets you either take a screenshot or record the screen.
You can choose to record the entire screen or just a portion. It also allows you to include audio, which is great if you’re narrating or want to capture sound from a movie or app.
Want to capture something fast? To just take a screenshot on Mac, press Shift + Command + 3 for a full screen capture or Shift + Command + 4 to grab a portion of the screen.
Recording is saved to your Mac’s desktop by default, but you can customize the save location and other settings through the Options menu that appears in the recording toolbar.
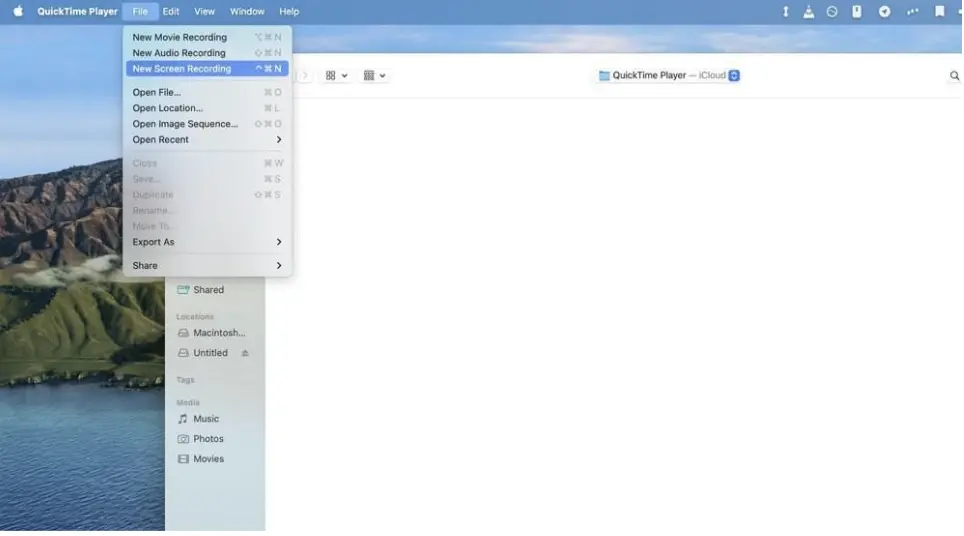
Another useful option for macOS users is QuickTime Player—yes, the same app often associated with video playback. It includes a screen recording feature that works smoothly, especially for capturing your entire screen or specific areas. Here’s how:
- Open QuickTime Player (you’ll find it in Applications).
- In the menu bar, go to File > New Screen Recording.
- A small window will appear. Click the record button, then choose whether to record the whole screen or a selected portion.
- You can also record audio by clicking the arrow next to the record button and selecting your microphone.
QuickTime recordings are saved in MOV format and can be edited in iMovie or other basic video editing tools. It’s a reliable choice when you want slightly more control than the keyboard shortcut method offers, without needing to install anything extra.
Using Third-Party Software to Record Your Screen
Built-in tools are great, but what if you need to record more than just one window? What if you want to edit your recordings, schedule them, or record desk screens on multiple monitors?
This is where third-party screen recording software comes in.
Why Choose Third-Party Tools?
Unlike default options, third-party programs offer more advanced controls. Want to record part of the screen, include webcam overlay, or separate audio tracks? These apps often deliver that flexibility.
For example:
- You may want to capture gameplay and add commentary over it.
- You’re recording a tutorial and need to highlight mouse clicks or show keystrokes.
- You need to save files in different formats or compress them for online sharing.
These scenarios benefit from software that goes beyond the basics.
Some programs also allow scheduled recording, which is handy if you want to capture a livestream or meeting while you’re away from your laptop.
Also, audio is often handled better in third-party tools. You can select specific input devices (like an external mic) and even clean up background noise in post-editing. If you’re creating something like a video guide, podcast clip, or walkthrough with your own voice, this is a big plus.
Popular Examples
While there are many options, the best tool often depends on your needs. For casual users, something lightweight and intuitive works best (like Movavi Screen Recorder). If you want better quality, editing tools, and full control, consider installing a reliable screen recorder for Windows. Professionals may prefer full-featured suites with extensive functionality (like OBS Studio).
And yes, many of these tools work across both Windows and Mac, so you don’t have to be tied to one OS. Just be mindful of system requirements and whether your device supports certain formats or hardware acceleration features.
Using an Online Recorder: No Installations, No Fuss
Not everyone wants to download software, especially if you’re on a shared or locked-down device. That’s where online screen recording tools come in handy.
These services run straight from your browser, which makes them incredibly convenient for quick jobs. Just visit the website, grant permission to record your screen and microphone, and hit record.
A screen recorder online might not offer all the bells and whistles of installed apps, but it gets the job done — and fast. Just be sure to choose a trusted platform that protects your privacy and allows local downloads, especially if you’re recording sensitive or personal data.
Online screen recorders are especially good for:
- Recording something in a hurry (e.g., capturing a bug to show tech support).
- Using public or borrowed computers where installing software isn’t allowed.
- Lightweight projects where editing isn’t needed.
Many online tools also include basic trimming, resolution selection, and export features, allowing you to finish the task without leaving your browser.
Tips to Improve Your Screen Recordings
No matter which method you choose, a few tips can dramatically improve the quality of your recordings:
- Clear your desktop: Too many icons or open apps can distract your viewers. Keep it tidy.
- Use good lighting: If you’re recording a webcam overlay, make sure your face is well-lit and visible.
- Adjust screen resolution: A higher resolution makes the final video look sharper. Just make sure your PC can handle it without lag.
- Check your audio: Test your mic before recording. Speak clearly and avoid loud keyboard clicks near the mic.
- Use hotkeys: Memorizing recording hotkeys saves time and avoids awkward pauses.
- Plan your recording: Even a rough script or bullet points will help you stay on track and reduce the need for re-recording.
Also, don’t underestimate the power of small edits. Even trimming out long pauses or cutting down unnecessary sections can make your video much more engaging and professional.
Conclusion
Recording your screen doesn’t need to be complicated. Whether you’re using the tools that come with your Windows or Apple device, installing a more advanced third-party app, or just launching an online recorder for a quick job, there’s a method that fits your needs.
Understanding how to record your computer screen is a useful skill. One that can boost your productivity, help you communicate better, or even start your journey into content creation. From capturing tutorials and presentations to saving moments from a video call, the possibilities are broad. All you need is the right tool, a bit of prep, and a clear idea of what you want to show.